Car paint correction is a multi-stage process that removes imperfections in the automotive clear coat/finishing. Automotive paint correction allows your vehicle to be restored to its original, brand-new condition as much as possible, back to the day when you first bought it. There is a method to go about it professionally, besides the do-it-yourself approach. Ideally, professional paint correction and detailing involve a few additional steps.
You can also go for a professional paint correction service at any trusted workshop. In this article, we are going to explore the generalized DIY automotive paint correction procedure. The following are the key steps in the process.
1. Removing debris via clay bar i.e., preparation
2. Wet sanding or levelling
3. Waxing and polishing
4. Resealing the paintwork

WHY IS CAR PAINT CORRECTION IMPORTANT?
Typically, car paint correction is carried out to rectify the mistakes in automotive detailing and paintwork. It helps in refurbishing the marred or faded coat on the car’s surface that makes it look unappealing and sub-par.
Plus, there is the usual assumption that paint correction is more about repair than it is about visual enhancement. Besides adding shine to the surface, it essentially fills the gaps, scratches, and flaking clear. Once paint correction is done, the surface becomes ready for ceramic coating.
Therefore, it is important to remember that when you spot signs of damage to the clear coat, it is only a matter of time that dirt, grime and debris will penetrate the surface and chip away the pigmented basecoat.
But, if the vehicle’s paint is fading, auto paint correction process will not work. There is a different process to restore faded paint on a car that you can follow.
THE DIY CAR PAINT CORRECTION PROCESS
Find below the detailed DIY paint correction steps, so that you can remove swirl marks and spider webs as well as coat imperfections, whenever you want. Before you proceed, buy automotive tools that are mandatory to get the job done.
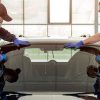
STEP 1: THE PREPARATION

Preparation is a requisite that you cannot ignore. Before you start with the automotive paint correction, you have to ensure that all surfaces are cleaned and properly prepped. You can take the following steps to make sure that your vehicle is properly prepared for the paint correction detailing:
- Wash your car thoroughly with a high-quality surface prep shampoo.
- Take a piece off the reusable clay bar mitt or towel, and use some clay lubricant to scrub the washed surfaces of your car’s exterior. This removes any kind of stubborn particles that may be embedded in the clear coat and was not removed with wash. Scrubbing also reduces the risk of fading.
- Once done, wipe the surfaces thoroughly with a plush microfiber drying towel and tape any areas that you don’t want to see buffed. Most often these include glass, light lenses, unpainted plastic trim, sensors, and chrome.
STEP 2: WETTING/LEVELING
The next step of the process is levelling. It demands an electric polisher or sanding wheel with a high-quality microfiber cutting pad and cutting compounds in various grades of coarseness.
The process goes something like this:
- Attach the microfiber cutting pad to an electric polisher. Apply some cutting compound to it and start with the coarsest compound and buffing pad, working towards finer grits with each completed pass.
- Keep in mind to replace the microfiber buffing pad frequently to avoid marring or cutting into the clear coat.
- Scrub the entire vehicle in the same way. Once done, attach a milder buffing pad and apply a finer rubbing compound to it.
- Repeat the process from 1-2 twice until you have worked your way up towards the finest grit buffing compound and the softest pad in the box.
STEP 3: POLISHING

The third step for car paint correction is polishing:
- Take a brand-new polishing disk and pad – one that contains an ultra-soft product intended purely for buffing.
- Squirt a small amount of the ultra-fine polishing compound on the pad. This is the lubricating product instead of an abrasive, unlike the levelling compounds in step 2.
- Keeping the body lines of the vehicle in view, start polishing the car using the buffing pad with clear coat.
- Change the pads as necessary until every inch of the clear coat has been polished. Depending on the levelling conducted, the ideal frequency is 2 or 3 times of repetition.
STEP 4: SEALING VEHICLE’S EXTERIOR
By this step, the automotive paint correction process is almost done. Now seal the newly-corrected exterior of your vehicle. Sealing the paint, reduces the frequent need for auto paint correction and also adds shine to the exterior.
Use an automotive wax to seal the paint. But this seal works for a limited time period and is less resistant to scratches. Instead, you can use paint protection films, paint sealants or nano-ceramic coatings to protect the new paint for a long time.
WHY DO CLEAR COATS OF VEHICLES BECOME SHABBY?

There are plenty of reasons that can cause your car’s clear coat to fade over time, demanding a car paint correction service. However, there are several ways you can repair car scratches, but here let’s find out how they appear on your car’s exterior:
SPIDER WEBBING
Not out of a fictional movie, spider webbing refers to the swirl marks that are commonly found in clear coat. It occurs due to improper circular washing methods, use of dirty towels, automated car wash, or high pH automotive shampoos.
SCRATCHES
Typically, as a result of many reasons, scratches usually occur due to contact with overgrown bushes, gales, and airborne debris.
WATER SPOTTING
Water drops are more than a cosmetic inconvenience, often leading to permanent damage because water droplets contain salt, road grime, and plenty of contaminants that can chip away at the paintwork.
ANIMAL CRAP
Animal crap is perhaps one of the commonest and most unavoidable causes of tattered clear coat. It affects the longevity of the finishing coat as animal poop can etch into the exterior surfaces.
INEXPERIENCED DETAILERS
Lack of experience can impact your car’s clear coat just like other external causes. Poor-quality speed polishers, buffing tools, and overuse of abrasive polishing all amount to the fault of the detailers affecting the clear coat.
Now you know how you can do paint correction and detailing of your vehicle on your own. However, make sure that you visit a professional for complete paint correction service when you see signs of deep scratches or etching Other than paint correction, you can also opt to change the colour of your car in the UAE, for which you can refer to our detailed guide on the car painting process that explains the steps and requirements.
Stay tuned to UAE’s top auto blog for more information about vehicle maintenance, driving rules and more.
Related Posts