A failing brake booster can make braking difficult and unsafe. If you’ve noticed a hard brake pedal, longer stopping distances, or a hissing noise under the dashboard, brake booster may be the cause of these issues. While it may seem like a challenging task, with the right tools and a step-by-step approach, you can replace it and restore your vehicle’s braking efficiency. Let’s walk through the process to replace a bad brake booster at home.
Understanding the Brake Booster
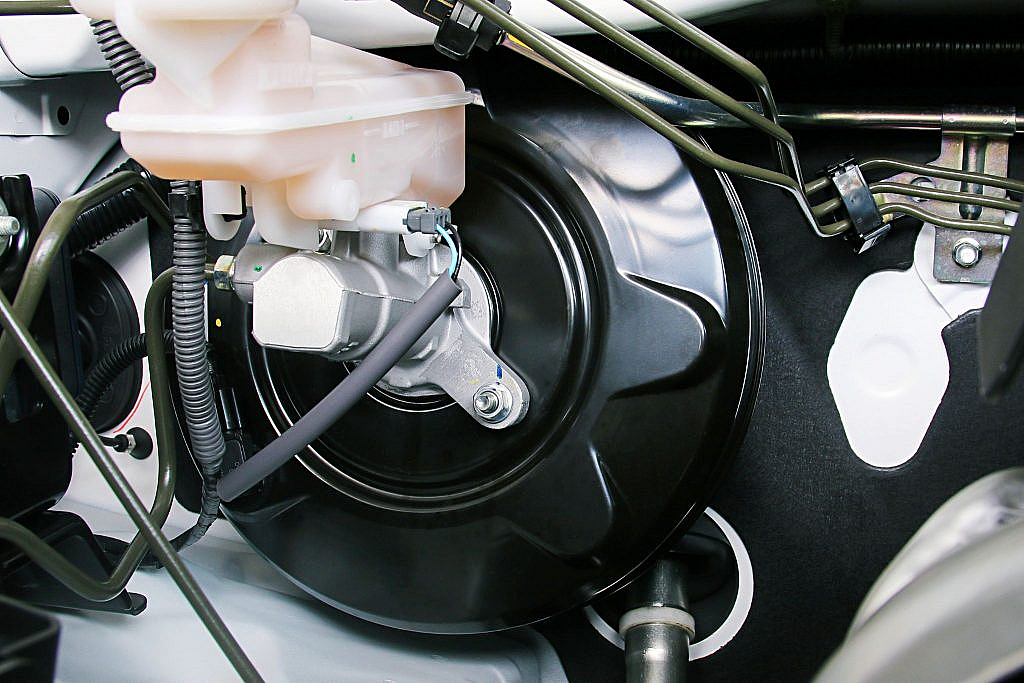
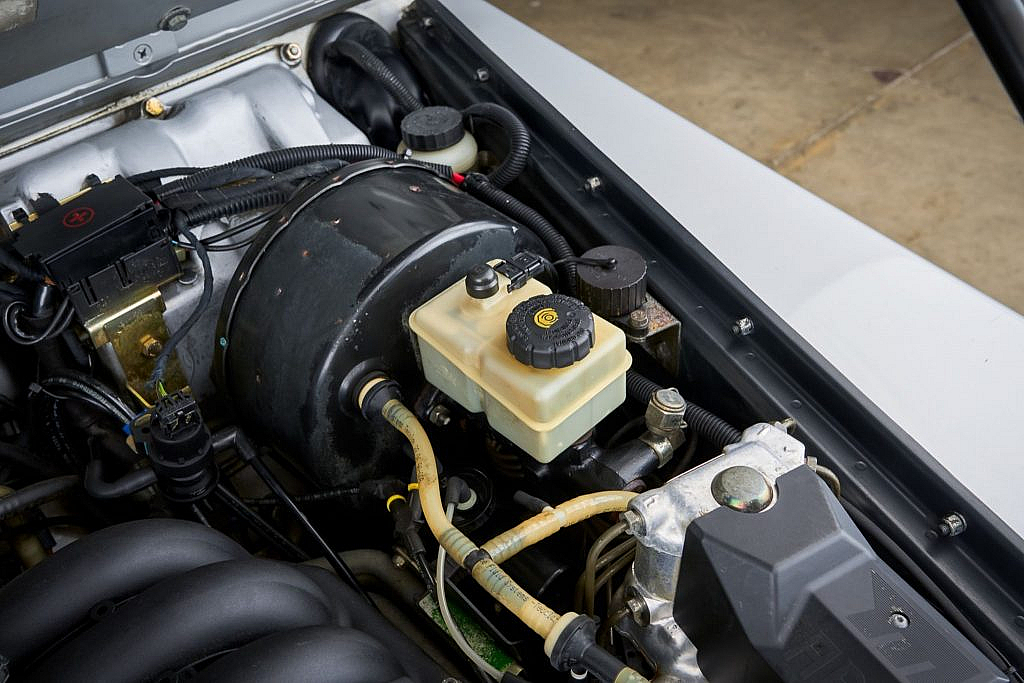
The brake booster is typically located on the firewall of the engine compartment, connected to the master cylinder and vacuum system. It uses engine vacuum to amplify the force applied by your foot on the brake pedal, allowing for smoother and more effective braking.
Steps to Replace a Bad Brake Booster
Replacing a faulty brake booster is essential for maintaining safety and the performance of any type of car braking system. If you notice a hard brake pedal or decreased braking efficiency, it could indicate a problem with the brake booster or other components of the braking system. A thorough inspection is recommended to determine the exact cause. Here is how to replace a bad brake booster.

Tools and Materials Needed
Before starting the replacement process, gather the following tools and materials:
- New brake booster
- Wrench set (including a ratchet and socket set)
- Line wrench (for brake lines, if needed)
- Flathead screwdriver
- Pliers
- Brake fluid (if necessary)
- Safety gloves and goggles
- Shop towels
- Vacuum pump (optional, for testing)
- Torque wrench
Step 1: Safety First
- Park the vehicle on a flat surface and engage the parking brake.
- Turn off the engine and disconnect the negative battery terminal to avoid electrical issues.
- Wear safety gloves and goggles to protect yourself.
Step 2: Locate the Brake Booster
- The brake booster is usually mounted on the firewall in the engine bay, behind the brake master cylinder.
- Identify the vacuum hose and the pushrod connection to the brake pedal.
Step 3: Disconnect the Vacuum Hose
- Locate the vacuum hose connected to the brake booster.
- Use pliers or a flathead screwdriver to loosen the clamp and carefully pull the hose off.
- Inspect the hose for cracks or damage; replace it if necessary.
Step 4: Remove the Brake Master Cylinder
- Using a wrench, loosen and remove the bolts securing the master cylinder to the brake booster.
- Carefully move the master cylinder forward without disconnecting the brake lines (if possible) to avoid air in the system.
- If the brake lines must be removed, use a line wrench to prevent stripping and be prepared to bleed the brake system later.
Step 5: Disconnect the Brake Pedal Linkage
- Locate the pushrod connection under the dashboard.
- Remove the retaining clip and pin using pliers or a screwdriver.
- Set aside all small parts carefully.
Step 6: Remove the Old Brake Booster
- Locate and remove the mounting nuts on the firewall holding the brake booster in place.
- Gently pull the old brake booster away from the firewall.
- Compare the old and new brake boosters to ensure compatibility.
Step 7: Install the New Brake Booster
- Position the new brake booster onto the firewall and align it with the mounting bolts.
- Secure it by tightening the mounting nuts using a wrench.
- Reconnect the pushrod to the brake pedal and secure it with the retaining clip and pin.
Step 8: Reinstall the Brake Master Cylinder
- Position the master cylinder back onto the brake booster.
- Tighten the mounting bolts to secure it.
- Reconnect the brake lines if they were removed and tighten them properly.
Step 9: Reconnect the Vacuum Hose
- Attach the vacuum hose back to the new brake booster.
- Secure it with the clamp to ensure a tight fit.
Step 10: Reconnect the Battery and Test the Brakes
- Reconnect the negative battery terminal.
- Start the engine and let it run for a few minutes to build vacuum pressure.
- Press the brake pedal to test its responsiveness.
- If the brake pedal is hard to press or non-functional, check connections and ensure there are no vacuum leaks.
Step 11: Bleed the Brakes (If Necessary)
- If you had to disconnect the brake lines, bleed the brake system to remove air.
- Follow the proper bleeding sequence for your vehicle. Bleeding the brakes removes trapped air from the brake lines, which can cause a soft or spongy brake pedal. This process involves opening bleeder valves at each wheel in a specific sequence while pumping the brake pedal or using a special tool to push fluid through the system.
Step 12: Perform Vacuum Test (Optional)
- If you have a vacuum gauge, connect it to check if proper vacuum pressure is being maintained in your new booster. A typical operating range is around 14 in-HG at idle.
Step 13: Final Inspection and Test Drive
- Check for brake fluid leaks or loose connections.
- Take the car for a short test drive in a safe area.
- Ensure the brakes engage smoothly and respond correctly.
FAQs
Can you fix a bad brake booster?
Yes, in some cases, a brake booster can be repaired if the issue is minor, such as a vacuum leak or a faulty check valve. However, replacing it is often the long-term solution.
Can you change a brake booster yourself?
Yes, replacing a brake booster is a DIY job if you have basic mechanical skills and the right tools. Follow this guide carefully to ensure a smooth installation.
How to tell if your brake booster is bad?
Common signs of a bad brake booster include a stiff brake pedal, increased stopping distance, hissing noises squeaking noise while applying brake and engine stalling when pressing the brakes.
Is it possible to rebuild a brake booster?
Yes, some brake boosters can be rebuilt by replacing seals, diaphragms and other components, but this requires specialised tools and knowledge.
How to test a brake booster of the car?
Use a handheld vacuum pump to apply vacuum pressure and check for leaks. If the booster fails to hold the vacuum, it is faulty.
Can a faulty brake booster cause a soft pedal?
No, a failing brake booster usually causes a hard pedal. A soft pedal is more often related to air in the brake lines or a failing master cylinder.
These are some easy-to-follow steps to replace a bad brake booster. Replacing a bad brake booster can significantly improve your vehicle’s braking performance. By following the aforementioned steps carefully, you can complete this task if you have basic mechanical skills. However, if you’re unsure or uncomfortable performing car brake repair, it is advisable to consult with a professional mechanic for assistance. Regular car brake maintenance is crucial for safe driving. This also includes addressing any issues promptly to ensure your vehicle is safe to drive.
However, if the braking issue persists even after replacing a faulty brake booster the problem may lie elsewhere. In this situation, upgrading to a new car is a viable option. Explore these used cars for sale in the UAE to pick your next ride with advanced braking systems.
Stay tuned to dubizzle UAE’s leading car blog to learn more about car upgrades and maintenance tips.
Related Posts